Money Lei'd || Graduation Season
Graduation season is quickly approaching and as we get excited about celebrating the many accomplishments of our graduates, we also start to think about what we can give them to help kick off the new chapter of their lives.
One thing that is very popular here on the islands to show our congratulations are leis, so why not up the game a bit and turn those flowers/candy into something we all wouldn't mind getting more of, some dollah bills! And what's great about leis, whatever it may be made out of, is that you can use it for any occasion you may be celebrating. In this D.I.Y., I will be showing you how to make a one-hundred $1 bill lei, but you can use any bill and any amount you want. It is so simple and easy to make, you might as well save that money you would pay for someone else to make it (or add it into your lei) and do it yourself at home!
Materials:
$$ bills
Curling ribbon
Tape
Steps:
1. Take your dollar bill and fold it in half, twice.


2. Then open up that that second fold and fold the sides in towards the middle, twice.


3. Then you want to fold the bill in half backwards so that you have a thin, strip.
Note: Make sure you crease down all the folds well (to make folding your bill into an accordion easier). I used a card to push down on the folds and make crisp creases.


5. Then you want to fold that fan or accordion in half and put in a bag for use later. Repeat steps 1-5 until you are done with all of your bills (in my case that was 100 times!!).

6. Once you have folded all of your bills, you want to get your curling ribbon ready. I made sure to pull out a lot of curling ribbon from the roll because in this case, it's better to have more than enough than too short of an amount of ribbon. You can always cut off the excess at the end or curl it to use as decoration for your lei. (Make sure you have double the amount of the length that you think you will need because you will have to fold it in half).
7. Take your ribbon and fold it in half and then tie a knot at the fold so that you have a loop at the top. (DO NOT tie the ends of the ribbon together).


8. Take one of your bills and rest it on top of the knot you just made, making sure it is centered. Then create a double knot on top of that bill using the two ends of your ribbon. Keep repeating this step until you have tied all of your bills to your ribbon.


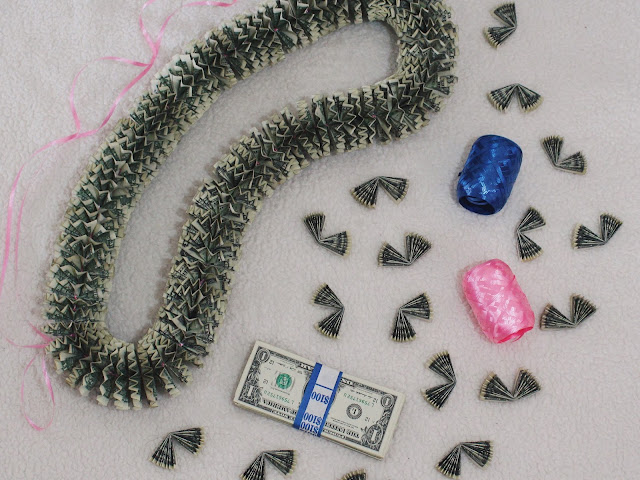
Note: (1) This part is a little harder in the beginning since the ribbon length is soo long and you have to keep pulling it through loops to make your knots. (2) Also, it is very time consuming but trust me, it will be worth it in the end. (3) For aesthetic reasons, make sure that all the bills are facing the same way so that the same shades of green are facing the same way and the over all look of your lei is uniform (pictured below).

9. When you are finally finished attaching all of your bills, you want to get your tape ready. I found that it was quicker and more efficient if you cut up a bunch of small pieces of tape and set them aside for you to grab, instead of cutting them every time you need a piece.
10. Then you want to go back to your first bill and bring the ends together to form half a circle and tape it together. Do the same thing to the other side of your bill to complete the circle. And once again, repeat this step until you have finished all of your bills.


11. Great news: you're almost there! All that there's left to do is to tie the two ends of your lei together and voila, you have yourself a money lei!


With the extra ribbon left hanging out, you can either cut it off to have a clean and simple look (which is what I did) or you can curl it and add in decorations of your own to personalize your lei to the person you are gifting it too.
Although this project can take up a lot of your time (for me it personally took around 10 hours to finish), it is so rewarding to see your own handiwork completed and bringing joy to the person you have made it for. Not only will they see the monetary gift that comes with this lei, but also the time, effort, and love put into creating such a wonderful piece.
-
Let's be friends!
IG: @thetoniletters
Twitter: @thetoniletters
FB Page: Lifestyle Letters
One thing that is very popular here on the islands to show our congratulations are leis, so why not up the game a bit and turn those flowers/candy into something we all wouldn't mind getting more of, some dollah bills! And what's great about leis, whatever it may be made out of, is that you can use it for any occasion you may be celebrating. In this D.I.Y., I will be showing you how to make a one-hundred $1 bill lei, but you can use any bill and any amount you want. It is so simple and easy to make, you might as well save that money you would pay for someone else to make it (or add it into your lei) and do it yourself at home!

Materials:
$$ bills
Curling ribbon
Tape
Steps:
1. Take your dollar bill and fold it in half, twice.


2. Then open up that that second fold and fold the sides in towards the middle, twice.


3. Then you want to fold the bill in half backwards so that you have a thin, strip.
Note: Make sure you crease down all the folds well (to make folding your bill into an accordion easier). I used a card to push down on the folds and make crisp creases.

4. Now you will see that you have a bill with even folds. You want to unfold all of that and then fold it back up following the lines, going back and forth, so that you end up with an accordion or fan.


5. Then you want to fold that fan or accordion in half and put in a bag for use later. Repeat steps 1-5 until you are done with all of your bills (in my case that was 100 times!!).

6. Once you have folded all of your bills, you want to get your curling ribbon ready. I made sure to pull out a lot of curling ribbon from the roll because in this case, it's better to have more than enough than too short of an amount of ribbon. You can always cut off the excess at the end or curl it to use as decoration for your lei. (Make sure you have double the amount of the length that you think you will need because you will have to fold it in half).
7. Take your ribbon and fold it in half and then tie a knot at the fold so that you have a loop at the top. (DO NOT tie the ends of the ribbon together).


8. Take one of your bills and rest it on top of the knot you just made, making sure it is centered. Then create a double knot on top of that bill using the two ends of your ribbon. Keep repeating this step until you have tied all of your bills to your ribbon.


Note: (1) This part is a little harder in the beginning since the ribbon length is soo long and you have to keep pulling it through loops to make your knots. (2) Also, it is very time consuming but trust me, it will be worth it in the end. (3) For aesthetic reasons, make sure that all the bills are facing the same way so that the same shades of green are facing the same way and the over all look of your lei is uniform (pictured below).

9. When you are finally finished attaching all of your bills, you want to get your tape ready. I found that it was quicker and more efficient if you cut up a bunch of small pieces of tape and set them aside for you to grab, instead of cutting them every time you need a piece.
10. Then you want to go back to your first bill and bring the ends together to form half a circle and tape it together. Do the same thing to the other side of your bill to complete the circle. And once again, repeat this step until you have finished all of your bills.


11. Great news: you're almost there! All that there's left to do is to tie the two ends of your lei together and voila, you have yourself a money lei!


With the extra ribbon left hanging out, you can either cut it off to have a clean and simple look (which is what I did) or you can curl it and add in decorations of your own to personalize your lei to the person you are gifting it too.
Although this project can take up a lot of your time (for me it personally took around 10 hours to finish), it is so rewarding to see your own handiwork completed and bringing joy to the person you have made it for. Not only will they see the monetary gift that comes with this lei, but also the time, effort, and love put into creating such a wonderful piece.
-
Let's be friends!
IG: @thetoniletters
Twitter: @thetoniletters
FB Page: Lifestyle Letters


This is such an interesting and unique gifting idea for the graduates.
ReplyDelete